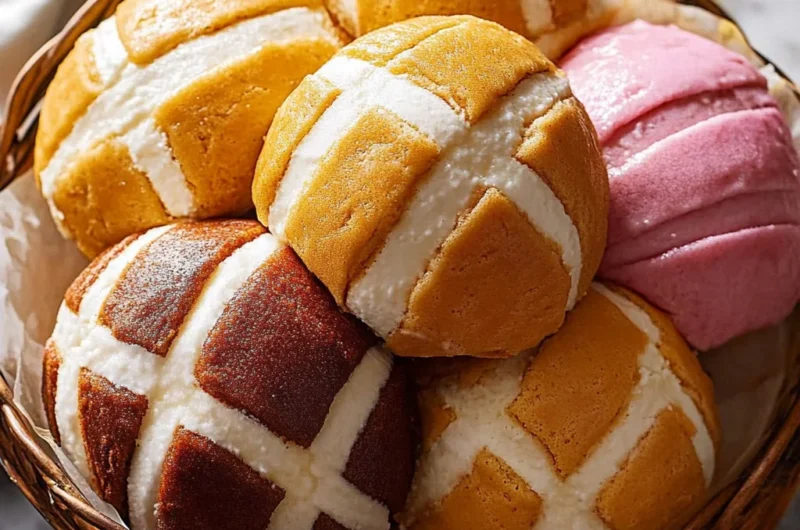
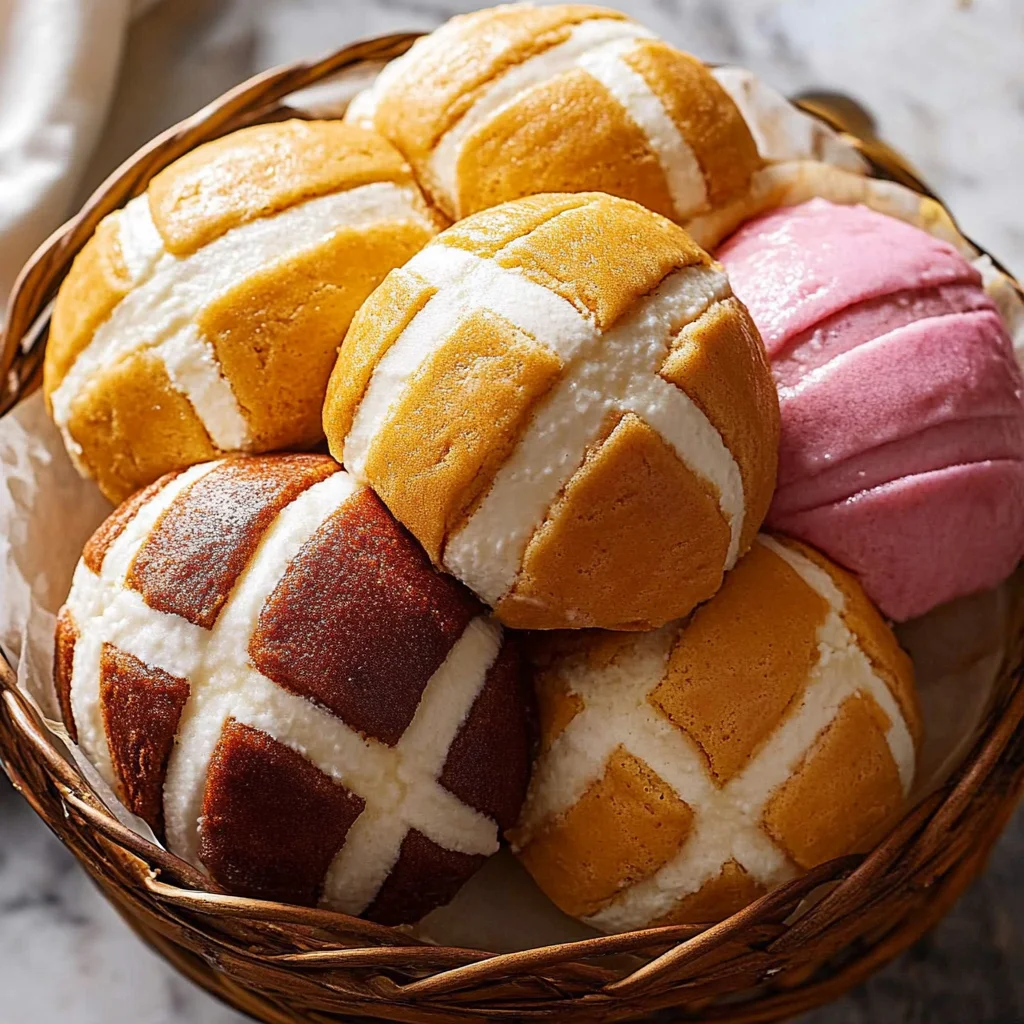
Imagine sinking your teeth into a warm pan dulce, the sweet aroma wafting through the air as its soft, pillowy texture crumbles just right. Each bite bursts with flavor, a delightful blend of sweetness and nostalgia that transports you to bustling bakeries where laughter and chatter fill the room, making every moment special.
Growing up, Sundays meant gathering around the kitchen table, indulging in these colorful pastries while sipping hot chocolate and sharing stories. Perfect for breakfast or an afternoon treat, pan dulce promises not just a taste but a heartfelt experience that’s sure to make your taste buds dance with joy!
Why will pan dulce make you smile?
Delightful: This recipe brings the sweet, fluffy goodness of traditional pan dulce right to your kitchen!
Simple: With just a few ingredients, you can whip up these treats in no time.
Versatile: Customize flavors and fillings to suit every palate—think chocolate, fruit, or even cream!
Crowd-pleaser: Perfect for gatherings, these pastries will impress family and friends alike.
Authentic: Enjoy the taste of Mexico with every bite—it’s a warm hug for your taste buds!
Pan Dulce Ingredients
For the Dough
- All-purpose flour – a versatile base that gives pan dulce its lovely texture.
- Granulated sugar – enhances sweetness and helps achieve that beautiful golden crust.
- Active dry yeast – crucial for that fluffy rise; make sure it’s fresh for best results.
- Milk – adds richness; feel free to use almond or oat milk for a dairy-free option.
- Eggs – provide moisture and structure; they also contribute to the lovely color of the dough.
- Butter – ensures a tender crumb; melted butter can be used if you prefer.
For the Topping
- Powdered sugar – for a sweet finish that contrasts beautifully with the spiced flavors.
- Ground cinnamon – adds warmth and depth; you can adjust according to your taste preference.
- Vanilla extract – infuses a delightful aroma; opt for pure extract for the best flavor.
Enjoy crafting your very own pan dulce, an enchanting treat that brings warmth to every family gathering!
How to Make pan dulce

1. Mix the Dough: In a large bowl, combine flour, sugar, yeast, and salt. Gradually add warm milk and melted butter until the mixture forms a soft, elastic dough. Knead for about 10 minutes.
2. Let it Rise: Cover the bowl with a damp cloth and allow the dough to rise in a warm place until it doubles in size, about 1 hour. This step is key for light and fluffy pan dulce!
3. Shape the Rolls: Punch down the risen dough and divide it into equal portions. Shape each piece into a ball or your preferred design—feel free to get creative!
4. Prepare the Topping: In a separate bowl, mix flour, sugar, and softened butter until crumbly. Add vanilla extract and food coloring if desired. This will create that beautiful sweet topping!
5. Apply the Topping: Gently flatten each dough ball and spread the topping generously over the surface. This adds both flavor and that signature look we all love.
6. Second Rise: Place the shaped rolls on a baking sheet lined with parchment paper. Cover them again and let them rise for an additional 30-40 minutes until puffy.
7. Bake to Perfection: Preheat your oven to 350°F (175°C). Bake the pan dulce for 18-20 minutes or until they’re golden brown on top and smell divine!
Optional: Dust with powdered sugar before serving for an extra touch of sweetness.
Exact quantities are listed in the recipe card below.
Tips for the Best pan dulce
- Use Fresh Ingredients: Always opt for fresh flour, yeast, and dairy to ensure your pan dulce has the best flavor and texture.
- Knead Well: Properly kneading your dough is crucial. Aim for a smooth, elastic texture—this helps achieve that delightful soft crumb.
- Avoid Overproofing: Keep an eye on your dough during its rise. Overproofing can lead to flat, dense pan dulce instead of the fluffy treats you desire.
- Experiment with Flavors: Don’t be afraid to add spices or citrus zest. A touch of cinnamon or orange can elevate your pan dulce to new heights!
- Watch Your Oven Temperature: Every oven is different! Use an oven thermometer to ensure precise baking temperatures for perfect golden-brown results.
How to Store and Freeze pan dulce
- Room Temperature: Keep your pan dulce in an airtight container at room temperature for up to 3 days to maintain its soft texture and delightful flavor.
- Fridge: If you need to store it longer, place the pan dulce in the fridge for up to a week wrapped tightly to prevent drying out.
- Freezer: For extended storage, freeze your pan dulce in an airtight bag or container for up to 3 months. Thaw overnight in the fridge before enjoying.
- Reheating: To bring back that fresh-baked goodness, reheat your pan dulce in a 350°F (175°C) oven for about 5-10 minutes, or until warm.
Pan Dulce: Creative Twists
Elevate your baking experience by customizing this delightful treat with these fun and delicious ideas!
- Gluten-Free: Swap regular flour for a gluten-free blend to accommodate dietary needs. This option keeps the texture fluffy and satisfying.
- Vegan: Replace eggs with flaxseed meal and use plant-based milk. Your pan dulce will still rise beautifully and taste divine.
- Citrus Zest: Add lemon or orange zest to the dough for a refreshing twist. A hint of citrus elevates the flavor profile, making each bite brighter.
- Chocolate Chip: Fold in semi-sweet chocolate chips for a decadent surprise. The melty chocolate pairs perfectly with the sweet bread, creating a delightful contrast.
- Nutty Crunch: Incorporate chopped nuts like pecans or almonds into the dough for an added crunch. This variation enhances the texture, making each piece irresistible.
- Spicy Kick: Mix in a dash of cayenne pepper or cinnamon for a warm heat. Just a hint can transform the entire flavor experience, adding depth to your pan dulce.
- Dried Fruit: Toss in raisins or dried cranberries for a sweet chewy element. The fruit adds bursts of flavor that complement the soft bread perfectly.
- Frosted Delight: Top with a light glaze made from powdered sugar and milk for an extra sweet finish. This simple addition makes your pan dulce even more indulgent!
Make Ahead Options

If you’re looking to savor the sweet delights of pan dulce without the last-minute rush, meal prep is your best friend! You can prepare the dough up to 24 hours in advance by mixing all your ingredients—flour, sugar, butter, and yeast—and then refrigerating it. Just remember to let it sit at room temperature for about 30 minutes before shaping and baking. Alternatively, you can shape the pan dulce and freeze them for up to 3 days; simply wrap each piece tightly in plastic wrap. When you’re ready to enjoy, let them thaw overnight in the fridge and bake as directed. This way, you’ll be greeted with freshly baked treats that maintain their fluffy texture and rich flavor!
pan dulce Recipe FAQs
What type of flour is best for making pan dulce?
The ideal flour for pan dulce is all-purpose flour, which provides the right balance of structure and tenderness. If you want a richer flavor, you can also blend in some bread flour for added chewiness. Just remember, the key to a perfect dough is not to overmix it!
How should I store leftover pan dulce?
To keep your pan dulce fresh, store it in an airtight container at room temperature for up to 3 days. If you live in a humid climate, consider wrapping each piece in plastic wrap before placing them in the container to prevent them from becoming stale.
Can I freeze pan dulce?
Absolutely! To freeze your pan dulce, wrap each piece tightly in plastic wrap and then place them in a freezer-safe bag or container. They can be frozen for up to 2 months. When you’re ready to enjoy them, simply let them thaw overnight in the refrigerator or at room temperature for about an hour.
What should I do if my pan dulce dough is too sticky?
If your dough is too sticky, don’t panic! This can happen if you’ve added too much liquid or if the humidity is high. Try adding a tablespoon of flour at a time until it reaches the right consistency—smooth but slightly tacky. Remember that kneading helps develop gluten, so don’t be afraid to give it some love!
Can I make a gluten-free version of pan dulce?
Yes! You can substitute all-purpose flour with a gluten-free baking blend that contains xanthan gum for better texture. However, keep in mind that gluten-free flours can behave differently, so you may need to adjust the liquid ratio slightly. It’s always fun to experiment until you find the perfect combination!
What flavors can I add to my pan dulce?
You can get creative with flavors by adding cinnamon, vanilla extract, or even citrus zest like orange or lemon for a refreshing twist! Additionally, incorporating fillings such as chocolate chips or fruit preserves can elevate your pan dulce experience and make each bite special.
Pan Dulce
Ingredients
Method
- In a large bowl, combine flour, sugar, yeast, and salt. Gradually add warm milk and melted butter until the mixture forms a soft, elastic dough. Knead for about 10 minutes.
- Cover the bowl with a damp cloth and allow the dough to rise in a warm place until it doubles in size, about 1 hour.
- Punch down the risen dough and divide it into equal portions. Shape each piece into a ball or your preferred design.
- In a separate bowl, mix flour, sugar, and softened butter until crumbly. Add vanilla extract and food coloring if desired.
- Gently flatten each dough ball and spread the topping generously over the surface.
- Place the shaped rolls on a baking sheet lined with parchment paper. Cover them again and let them rise for an additional 30-40 minutes until puffy.
- Preheat your oven to 350°F (175°C). Bake the pan dulce for 18-20 minutes or until they’re golden brown on top.